Coach's Practice Guide
ClipboardIQ's AI coaching assistant knows your roster, tracks your opponents, and plans every practice using sports science. Here's how to get the most out of it.
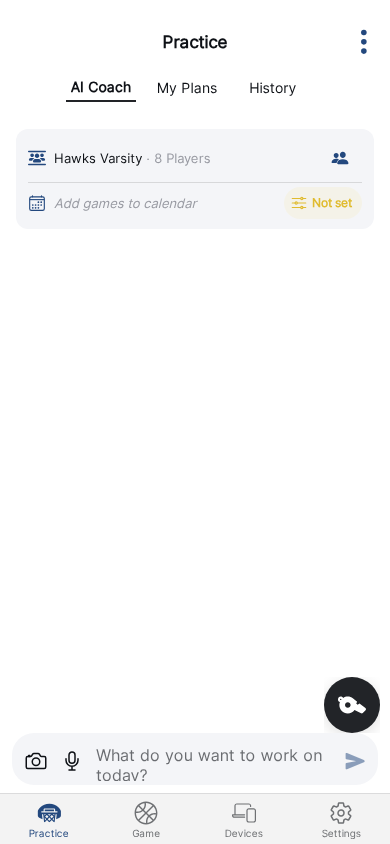
1. Your AI Coaching Assistant
Open the Practice tab and you'll see the AI Coach chat. Before you type a word, the AI already knows:
Your Roster
Player names, positions, skill notes, and development reports from your squad.
Season Phase
Preseason, mid-season, or playoffs — practice intensity adjusts automatically.
Game Schedule
Days until your next game, opponent history, and your season record.
What Worked Before
Drill ratings from past practices feed into future recommendations.
2. Game Day Preparation
When you have a game coming up, just mention your opponent. The AI adjusts everything.
What the AI does automatically:
- Pulls your history against that opponent — W-L record, scores, and any notes you've left
- Adjusts practice intensity based on how many days until game day (microcycle planning)
- Adapts for your age group — youth teams get shorter, more varied drills; competitive teams get longer focus periods
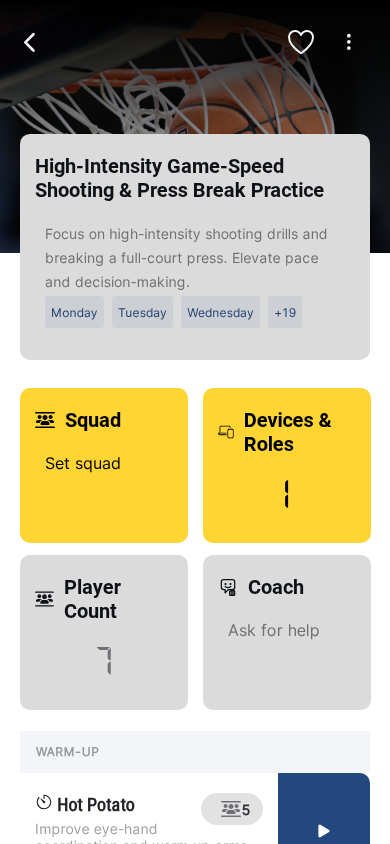
3. Automatic Season Periodization
Every practice plan follows sports science principles. The AI structures all plans in four phases and adjusts based on where you are in the season:
Default Practice Structure
Dynamic stretching, basketball-specific movements. No static stretching before activity.
Core technical work when players are fresh. New concepts introduced here.
Game-like scenarios, controlled scrimmages with specific focus areas.
Static stretching, heart rate recovery, team huddle and key takeaways.
This is the default structure. The AI adjusts phases, durations, and emphasis based on your preferences and conversation.
Season Phase Adjustments
4. Player Skill Reports
The AI builds a profile of each player over time — not through forms, but through quick questions after practice.
What gets tracked:
- Skill ratings — ball handling, shooting, defense, conditioning
- Improvement over time — the AI tracks how players develop across sessions
- Effort level — engagement and work ethic during drills
How it works
5. Creating and Running Practice Plans
Using the AI (recommended):
Other options:
- Quick Practice — start immediately with pre-set drills, no planning needed
- My Plans tab — create manual plan templates and add your own custom drills
- Attach images — upload a box score or handwritten plan and the AI will analyze it
- Voice input — tap the microphone and speak naturally
6. Drill Feedback — How the AI Learns
After each practice, ClipboardIQ asks quick questions about how drills went. This is how the AI gets smarter.
When feedback is collected:
- After saving a plan — quick reaction ("Was this helpful?")
- After running a session — "How did this drill go for your team?"
- On app open — occasional question about a recent drill
What it improves:
- Drills that worked well get recommended more often
- Drills that didn't work get deprioritized for your team's context
- Missing drill metadata (age suitability, intensity) gets filled in after a few uses
7. Squads and Player Management
Your squad data syncs from your account automatically. Here's what the AI uses:
Squad Setup
Your squad's age group and team size are factored into every plan. The AI also asks about your coaching style and preferences to personalize recommendations.
Player Notes
Add notes about players — positions, strengths, areas to improve. The AI uses these when selecting drills.
New Team Detection
Added 5+ new players? The AI recognizes it's a new team and adjusts: more fundamentals, less complex sets.
8. Season Tracking & History
ClipboardIQ keeps a complete record of your season and feeds it back into the AI.
Season Record
Your overall W-L-D record, tracked automatically from game results. The AI sees your season record and factors it into practice recommendations.
Opponent History
Every time you play a team, the result is stored. Next time you face them, the AI recalls: "You're 3-1 against Middletown. Last game: 48-42 W."
Practice History
Browse past practices, see which drills were used, and review duration and performance data for each session.
Drill Effectiveness
Over time, the AI learns which drills work for your specific team — age group, skill level, and coaching style all factor in.
9. Running Drills During Practice
Once you have a plan, tap Run on any drill to start it. During the drill:
Coach's Screen
- Start/stop the timer
- Track team scores in real time
- Assign players to teams
- Track individual player scores
Display Screen
- Team scores and target score
- Timer
- Player and team stats
Connect multiple devices so one shows the scoreboard while you control from your phone. Set this up in the Devices tab.
Ready to transform your practices?
Download ClipboardIQ and let the AI handle the planning — so you can focus on coaching.
Download the App View All Features